
Written by Michael Coen
If you’ve ever used one of Blackmagic’s Pocket Cinema Cameras (4K or 6K), you know how great these cameras are. Stellar color science, impressive performance specs, and professional codecs, all packed into a small, affordable cinema camera. However, quirks like their odd shape and fixed touch screen pose some challenges when rigging them out. Here is a list of items that make up my default BMPCC6K setup for projects where you need to show up with a tool that can handle most basic cinematography jobs when operating on a tight budget. The entire set-up costs less than $6,000.

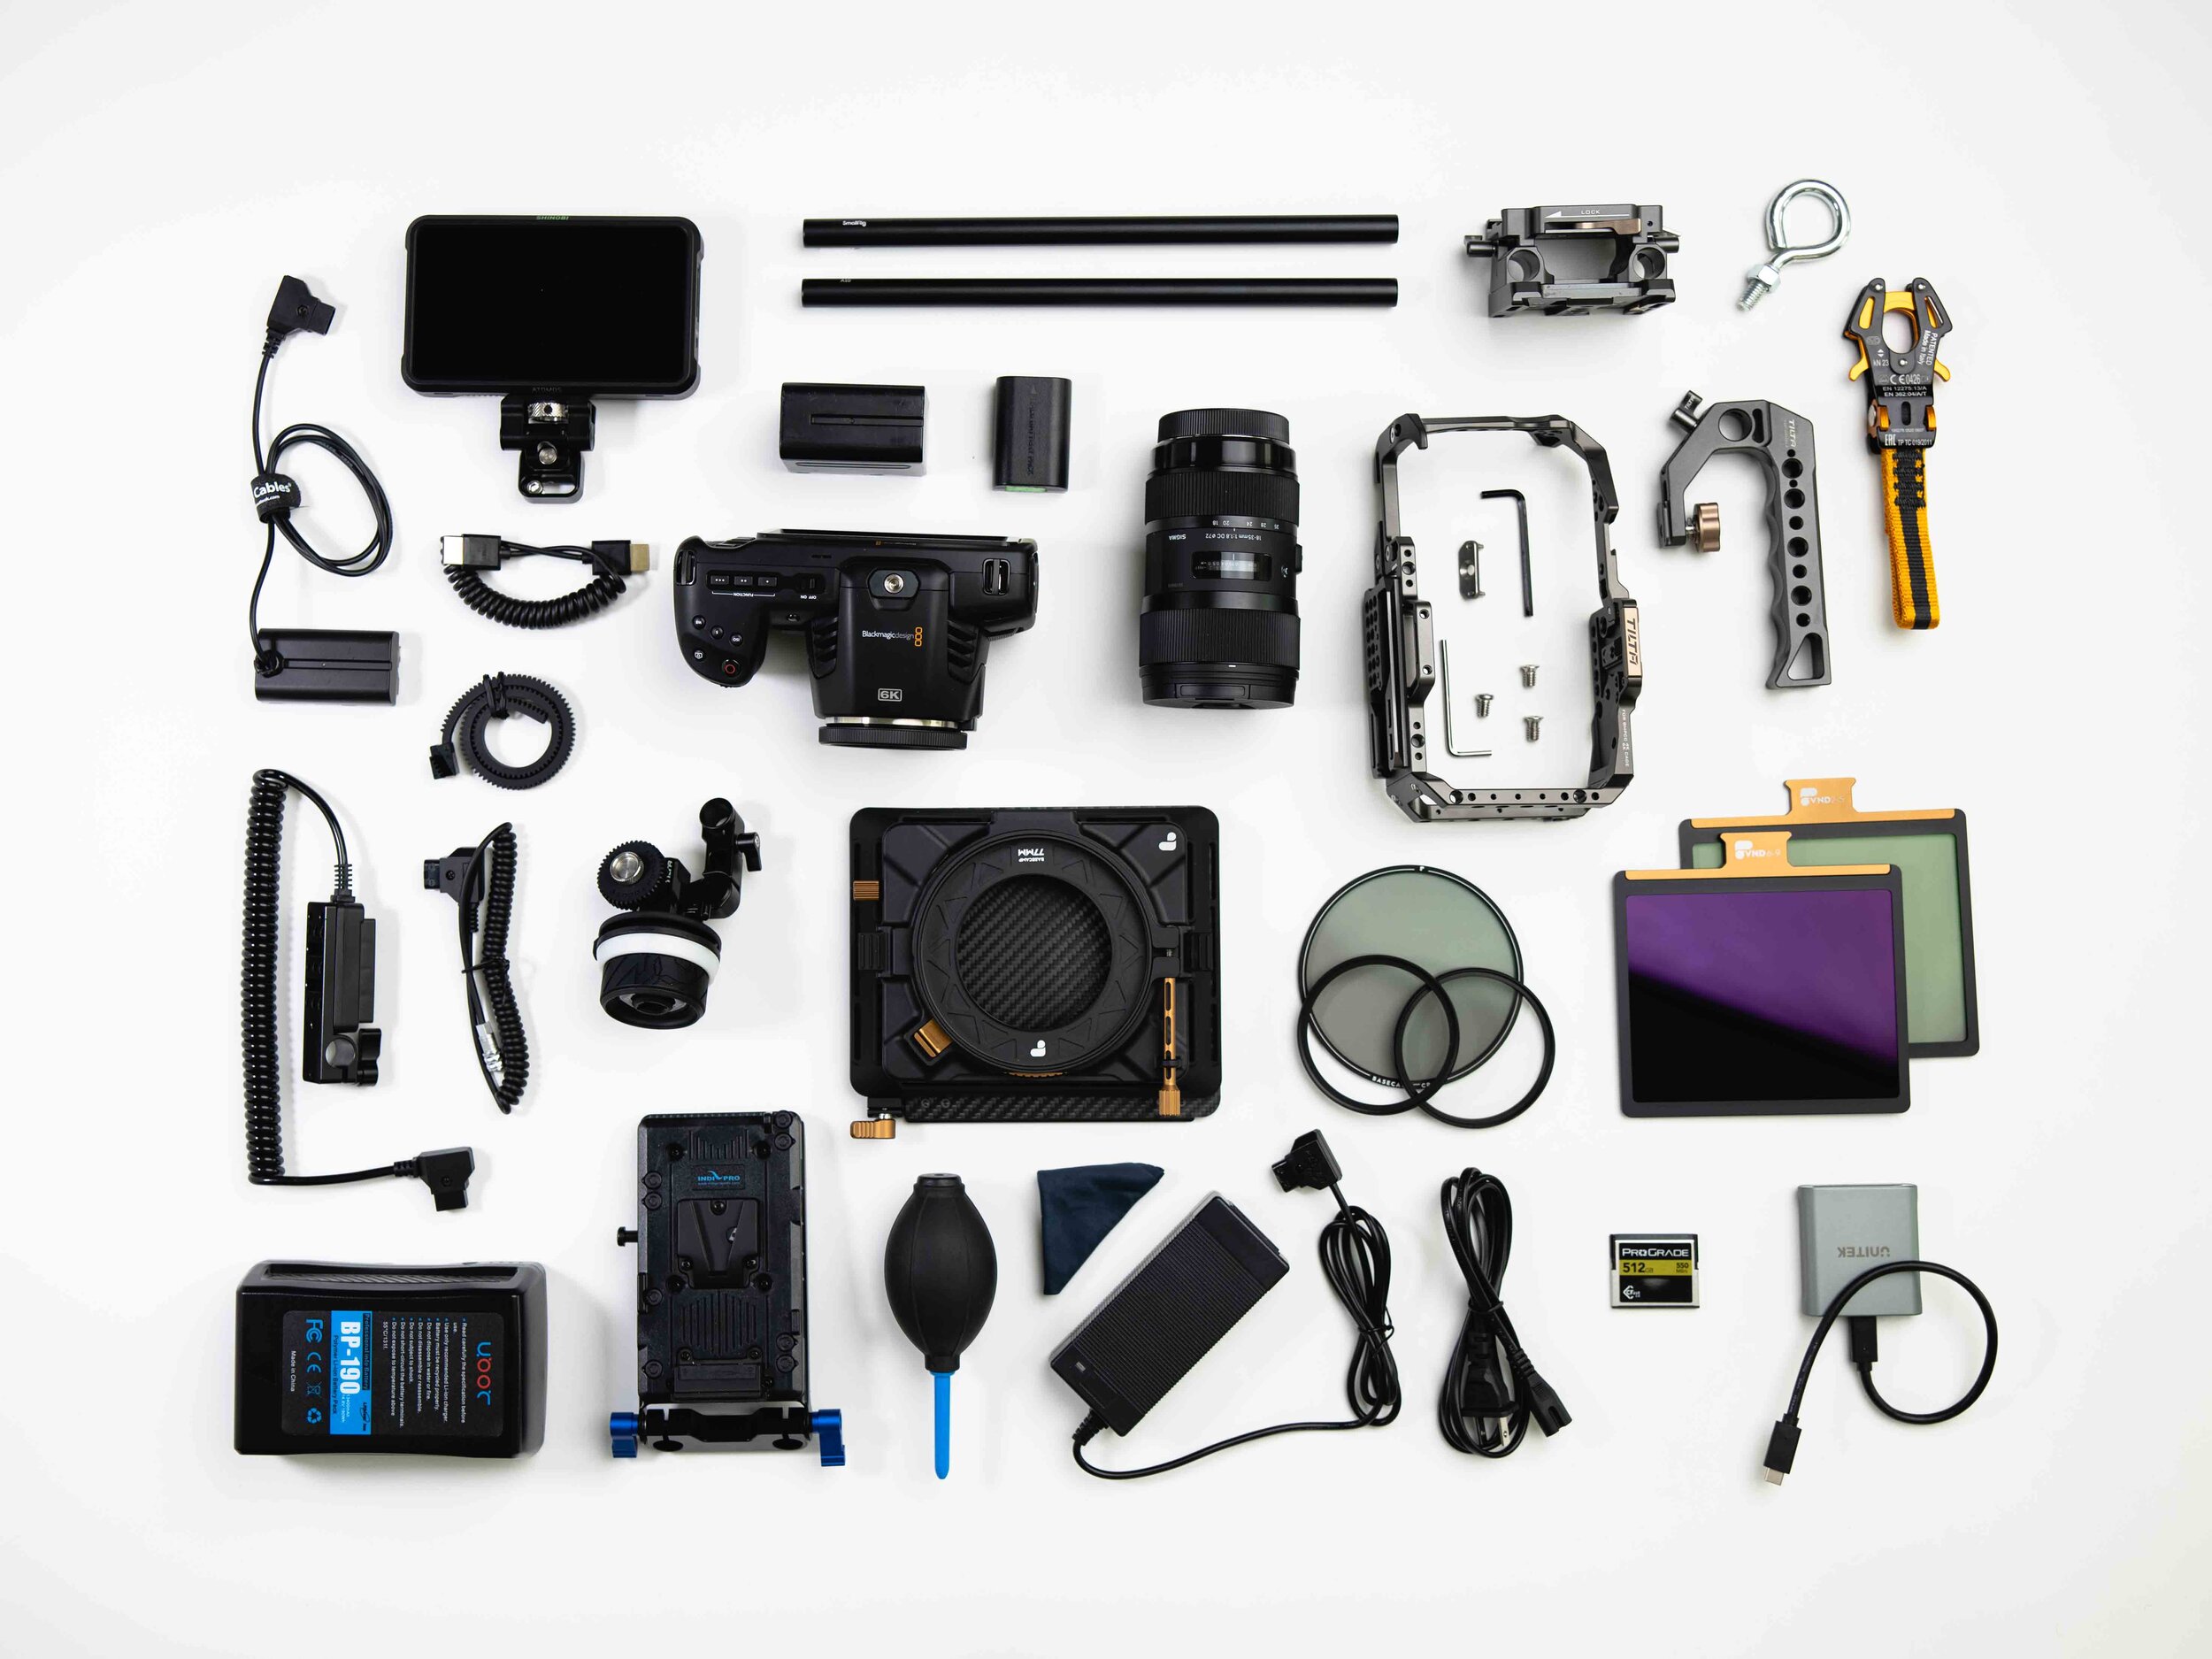
Blackmagic Pocket Cinema Camera 6K: https://amzn.to/35muSmR
There simply aren’t better cinema cameras out there for less than than $2,000! It also comes with a LP-E6N battery that you should leave in the camera when operating with this setup, despite powering the camera with a v-mount battery.Sigma 18-35mm f/1.8 EF-Mount Lens: https://amzn.to/38odTmc
This lens is popular for good reason. The field of view range is equivalent to 27-52.5mm on a full-frame sensor, giving you a solid mid-range zoom lens. With a constant maximum aperture of 1.8, it’s like having a few primes in one lens. If you can only afford one lens, it’s hard to go wrong with this.ProGrade 256GB C-Fast Card: https://amzn.to/3bhp2XA
I’ve never had any issues with these C-Fast cards. I know a lot of people prefer to use external ssd’s but in my personal experience, it has always been more reliable to use C-Fast cards and record internally.C-Fast Card Reader: https://amzn.to/3bi95Aw
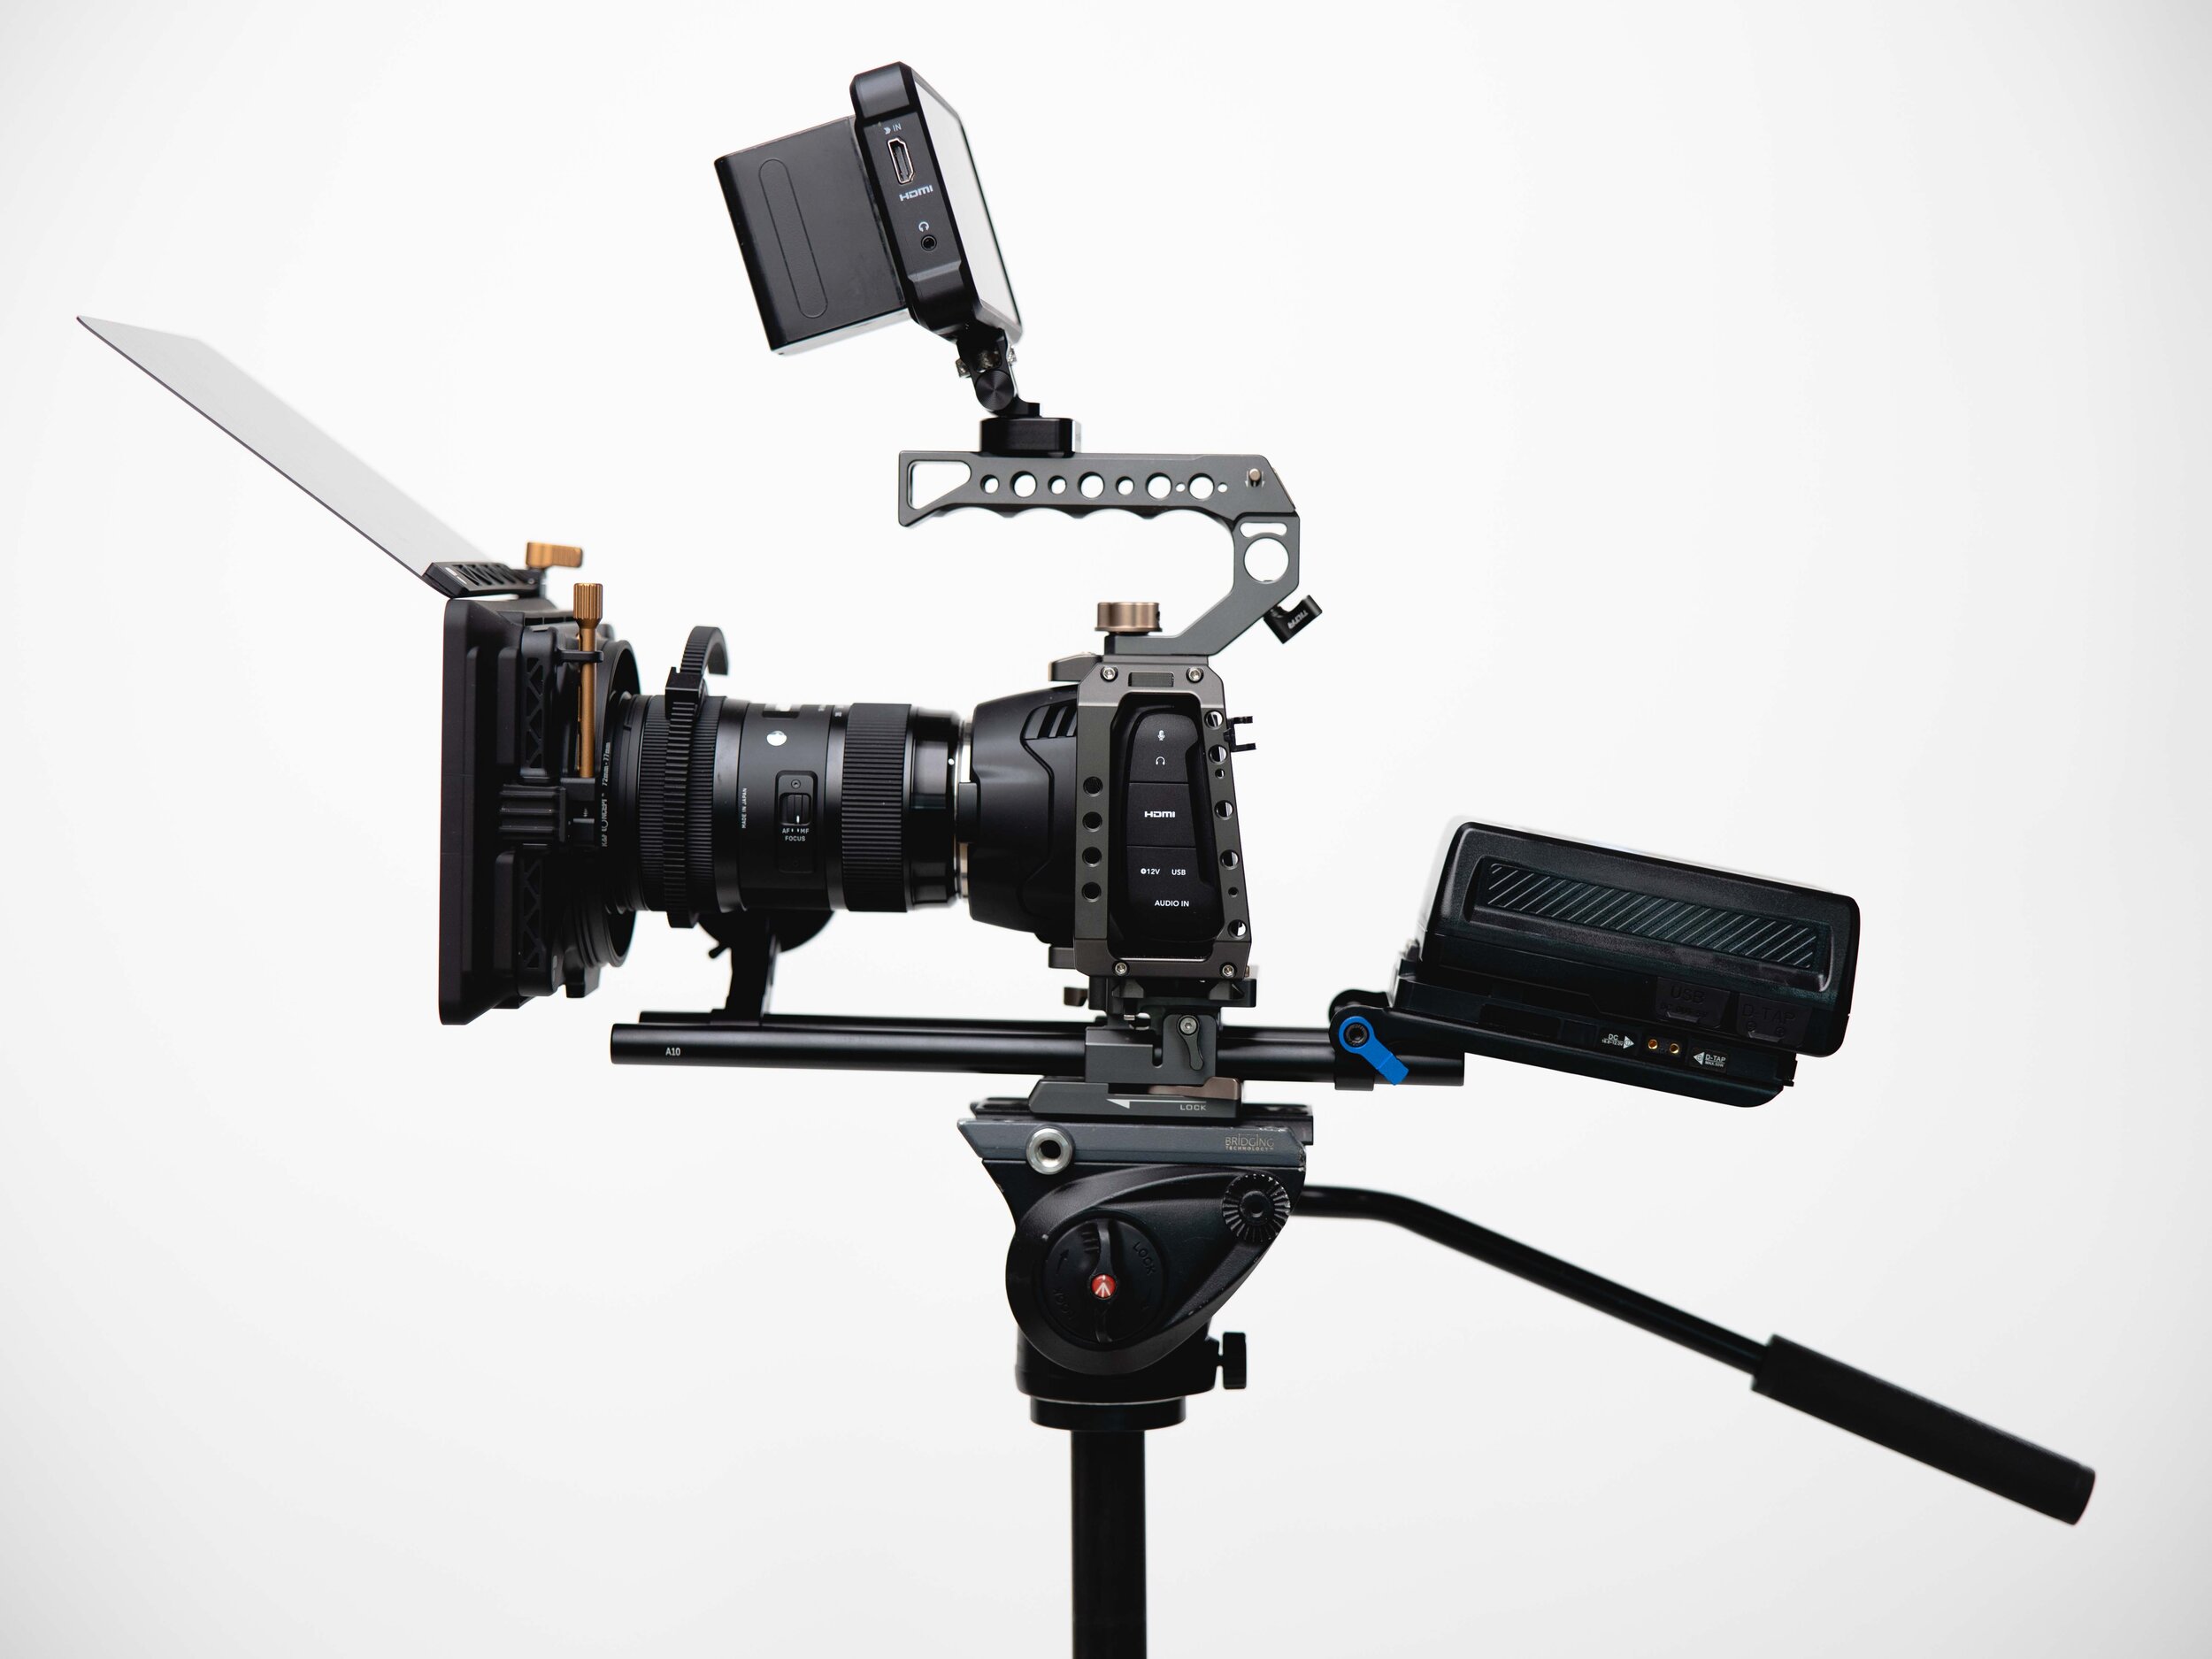
Tested and approved.Tilta Full Cage for BMPCC 4K & 6K: https://amzn.to/3hU7kuH
A cage is usually necessary for rigging out any cinema camera with accessories.Tilta Baseplate: https://amzn.to/3s6IU5E
This is so you can attach rails to your setup.Tilta Top Handle: https://amzn.to/2XkyelT
You can also fix the monitor to the top of the handle for easy viewing.SmallRig 12” Rails: https://amzn.to/2XiWTam
These rails allow you to attach accessories like a follow focus and v-mount battery.Atomos Shinobi Monitor: https://amzn.to/3hTmXT3
A user-friendly, bright monitor.SmallRig Swivel & Tilt Monitor Mount: https://amzn.to/2XkpQCZ
Use whatever monitor mount you’d like. I like the action on this one but I would consider getting a more flexible monitor mount depending on how you plan on using this rig. Attaching this set-up to a shoulder rig or EasyRig may change where you prefer to position the monitor.Dummy Battery to D-Tap for Monitor: https://amzn.to/2MFqLM9
Tested and approved.HDMI Coiled Cord: https://amzn.to/39fe4PI
Tested and approved.D-Tap to BMPCC 4K or 6K: https://amzn.to/3bfYHcA
Tested and approved.D-Tap Splitter: https://amzn.to/3bdAmnM
This allows you to safely power both the camera and the monitor from the v-mount battery.Tilta Mini Follow Focus: https://amzn.to/3oqmElg
The cool part about this follow focus is that its throw perfectly matches the focus throw of the Sigma 18-35mm f/1.8 lens. It also comes with its own focus gear to wrap around the lens.V-Mount Battery: https://amzn.to/3s5LSYo
This 190Wh battery should be plenty of power for a normal one-day shoot. It comes with its own charger.IndiPro V-Mount Adapter Plate: https://amzn.to/3ooSy1z
This will allow you to mount the battery to the rails and is needed for powering the devices on the rig via the D-Tap splitter.PolarPro Matte Box: https://www.polarprofilters.com/products/basecamp-ultralight-matte-box-system
Super lightweight and easy-to-use, this matte box makes changing its included neutral density and circular polarizer filters a breeze.Step Up Rings: https://amzn.to/35nb5DI
The 72mm to 77mm step-up ring allows you to attach the Sigma 18-35mm f/1.8 lens onto a 77mm filter and then to the PolarPro matte box, or directly onto the PolarPro matte box.Tiffen Black Pro Mist Filter ¼ (optional): https://amzn.to/3q0U8ag
I have been using this filter on a lot of projects but you can use any screw-on diffusion or stylized filters, depending on what the project calls for. As long as it has a 77mm or 82mm thread size, you’ll be able to adapt it to the PolarPro matte box.Therefore, the order is: Camera > Lens > Step-Up Ring > Preferred Diffusion Filter > Matte Box w/ ND & CP Filters.
Eye Bolt (optional): https://amzn.to/3s6aMqE
A 10 pack is overkill but any ⅜” eye bolt will do. This will make it easier to hang your camera rig from a body harness like an EasyRig.Kong Frog Climbing Quick-Release (optional): https://amzn.to/3bfEfsp
I learned to use this nifty piece from a friend and fellow cinematographer, Devin Tolman. If you do use a body harness like an EasyRig, attach the Kong Frog to the camera hook so you can quickly clip it on and off the eye bolt on the top of the cinema rig.
I know most people would want this on a shoulder rig but I’m taller than the average cam op (6’3”) so I’ve never liked having my POV that high. Instead, I often hang this from an EasyRig.
In the end, every shoot is different. And while you should use the right tool for the job, I’ve found this setup to be more than enough for most of our video production projects which tend to be small to medium-sized shoots. For anything larger, we typically rent a larger cinema camera or hire a DP who owns their own kit.
Overall, I’ve really enjoyed using both the P4K & P6K and I’m excited to see what Blackmagic does next. If you’re a cinematographer, I’d love to know your thoughts. How have you managed to build out these cameras?